A sneak peek at the Game Engine's API

I know that I tend to talk a lot about my game engine. I also noticed that haven't given you a sneak peek at the Game Engine's API.

When I started development of the engine, one of my primary goals was to create an engine with an user-friendly API. That is the API needed to be compact, small and easy to remember.

In short, I wanted an engine that helps me focus on developing a game rather than wasting time reading through tons of API documents.

So, let me give you a sneak peek.

Initializing Objects (3D models)

The engine works hand in hand with Blender 3D. The engine includes a Digital Asset Exporter, written in Python, which exports your 3D models done in Blender, into data the engine understands.

The initialization is quite simple. For example, let's say that you have modeled this 3D model in Blender and you want to use it in the engine.

After you run the python script, a file is generated. This file contains all the attribute data of your model, such as vertices, normals, UV maps, etc. This file is copied into your project.

In your initialization routine of the engine, you ask the engine to render this model by just calling the init method:

myModel->init("guardian","guardianfile.u4d");

The method requires the name of the 3D model and the name of the file you imported.

If the engine confirms that all the 3D model data is valid, it loads all the rendering information into the engine.

The only thing left to do is to add the model into the scenegraph. You do so by calling the addChild method:

addChild(myModel);

And that is it. The engine will render your model on your mobile device.

Enabling Lights and Shadows

WIthout light, you can't see. And without shadows, you can't make out visual details. Currently, the engine allows only one Light object per scene. That is, the light object is implemented as a singleton. You need to initialize a Light object, else, the whole scene will appear dark. Luckily, to initialize a light object is as simple as doing this:

//Create a light object
U4DLights *light=U4DLights::sharedInstance();

//Translate the light
light->translateTo(0.0,10.2,1.0); 

The engine gives you the flexibility to choose which model to cast shadows and which one not to. Again, doing so is very simple:

myModel->setEnableShadow(true);

The engine will cast a shadow on the selected objects:

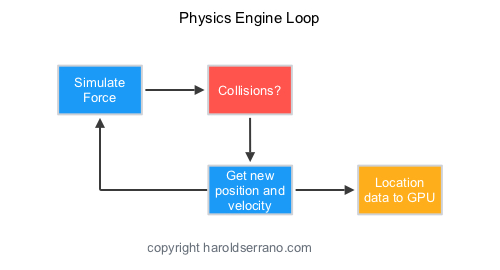
Enabling Physics and Collisions

If you want a model to be affected by external forces, such as gravity, or any other applied forces, the engine gives you the flexibility to do so with one line of code. To enable such feature, simply call the enableKineticsBehavior method on the model.

myModel->enableKineticsBehavior();

And if you want to enable collisions between objects, you simply call the enableCollisionBehavior method:

myModel->enableCollisionBehavior();

The engine will enable gravity and collision properties on the selected objects:

Initializing Animations

Playing an animation is as simple as the initialization method explained above. 100% of the time, you would have rigged and animated your model in Blender. The Digital Asset Exporter also imports armature and animation data into the engine. All that you need to do is provide the name of the animation and the name of the file containing this information. To initialize an animation, you create an animation object and load animation data, as shown below:

walkingAnimation=new U4DAnimation(this);

if (loadAnimationToModel(walkingAnimation, "walking", "walkinganimation.u4d")) {
}

To play the animation, simply call the play method:

walkingAnimation->play();

If the animation has been loaded properly, the engine will play the animation:

As you can see, you can load a model onto your mobile device using a few lines of code. And the engine allows you to enable shadows, collision, and animation with a single line of code.

Thanks for reading.

Porting the game engine from OpenGL to Metal

If you are not aware of, Apple came out with its own graphics library; similar to OpenGL, a couple of years ago. The name of this graphics library is Metal.

When Metal came out, I had barely finished the first stage of my game engine. Back then, I thought that it would be a good idea to port the engine to Metal. However, I resisted in doing so, until Metal became stable.

Well, on the weekend of July 4th, 2017, I happened to play around with some Metal demo apps, and I was impressed at Metal's power. It was then that I decided to use my four-day weekend learning and porting the engine from OpenGL to Metal.

And so I did.

I spent Saturday morning to Tuesday night learning Metal in depth. I didn't even go out at all during those four days. I was focused and excited to learn about Metal.

On Tuesday night, I laid out a plan on how to port the engine from OpenGL to Metal. All in all, the porting took about two weeks. There are some minor bugs to fix, but all in all, I'm pleased with the results. Here is a screenshot of the engine using Metal.

 
Engine using Metal

Engine using Metal


So what did I learn?

Most of what I know about Metal, you can find it here. I wrote these articles a while ago,; I used them as a reference during my review and the porting. But here are the main things that you should know about Metal:

  • Metal is not as convoluted as OpenGL. Metal is clean and has the concept of Objects. You can think of it as an Object-Oriented language, but for graphics. It is amazing to work with. Seriously.
  • Metal is less forgiving than OpenGL. During the porting, I noticed many incorrect Computer Graphics implementation done in the engine. At first, I thought that the issue was with Metal but then realized that I had made several mistakes using OpenGL. OpenGL did not make a big deal about it, but Metal did mind and kept spitting out error messages. For example, I had incorrectly implemented certain aspects of Normal Mapping, Shadows, and Vertex-Skinning.
  • The Perspective and Orthogonal projection matrices you use in OpenGL based games will not work on Metal. You need to compute a different projection matrix for Metal. The reason is that Metal uses a different coordinate system than OpenGL. I will write more about this issue later. However, if you need an example of these matrices, send me a message, and I'll provide you with one.

It is amazingly simple to work with Metal. However, since there are not plenty of tutorials out there, it may be hard for a newbie to get Metal working.

If you have experience working with OpenGL and have a good grasp of computer graphics, Metal will be a piece of cake to learn. I can guarantee that you will love it. However, if you are a newbie, keep in mind, that it may take a while for you to grasp Computer Graphics concepts and Metal at the same time. Hopefully, these articles can help you out.

Thanks for reading.

Become a documentarian of your work

I enjoy reading rags to riches stories. They are powerful, inspirational and they resonate with our emotions. Humble beginnings connect us. They are a reminder that no matter who you are, or how broke you are, you do have a chance to succeed.

Game Engine Beginnings. Circa 2013: Implementing the rendering engine.

Game Engine Beginnings. Circa 2013: Implementing the rendering engine.

Now and then, I search on Wikipedia the stories of successful companies. I look for any photos that were taken before they made it big. I enjoy reading their "About" page and get a glimpse of how it all started.

Success is not glamorous as the media sells it. In fact, It is a lot of time working in the dark. I know this fact first hand.

Game Engine Beginnings. Circa 2013: Improving the rendering engine

Game Engine Beginnings. Circa 2013: Improving the rendering engine

I worked over 15,000 hours in developing a 3D game engine. I would wake up at 5 am and work on the engine from 5am-7am before heading to work. I worked on it during my lunch break. And then again after work. And during the weekends, I would work on it for about 16 hours. I wanted to develop a 3D game engine so bad, that it became my life for about three years and a half.

Game Engine Beginnings. March 2014: Improved the engine to render textures.

Game Engine Beginnings. March 2014: Improved the engine to render textures.

Throughout this time, the thought of failure kept disturbing my peace. I kept thinking, what if I fail and have nothing to show? What if this is just a waste of time?

Game Engine Beginnings. April 2015: Improved the shadows in the engine

Game Engine Beginnings. April 2015: Improved the shadows in the engine

However, I found a way to combat it. I was inspired by Austin Kleon to document the humble beginnings of my game engine. At first, I was against this idea. In my mind, nobody would want to see the progress of my game engine. But Austin made me realize that it is the process, not the end product, that makes our work exciting and inspiring.

Game Engine Beginnings. July 2016: Collision Detection System implemented.

Game Engine Beginnings. July 2016: Collision Detection System implemented.

I want to let you know that you are not alone in your struggles. It is OK if your game is not glamorous yet. It is OK if your indie game studio is your room. That is OK if your game only sold ten copies. And there is something powerful about your struggles.

Game Engine Beginnings. Sept 2016: Improved animation and shadows effects.

Game Engine Beginnings. Sept 2016: Improved animation and shadows effects.

The finish line of success does not inspire people. It is the road you took to achieve it. It is your suffering, the pain, the obstacles that make your story interesting. It is what gives others strengths to go beyond they thought possible. It is your underdog story that connects us as human beings and inspires us.

Game Engine Beginnings. Aug 2016: Game engine first demo.

Game Engine Beginnings. Aug 2016: Game engine first demo.

So document your humble beginnings. Share photos and videos of your work in progress. Take screenshots of your game. Share pictures of your indie studio; even if it is your room. Write about your struggles and how you overcame them.

Game Engine Beginnings. Dec 2016: Added particle system to the engine.

Game Engine Beginnings. Dec 2016: Added particle system to the engine.

Don't worry if your game characters look like crap. Don't worry if your game mechanics suck. Don't worry if there are plenty of bugs. It is all OK. As indie game developers, we can all relate and do understand that it is a work in progress.

Game Engine Beginnings. Dec 2016: Tested the engine collision detection capabilities.

Game Engine Beginnings. Dec 2016: Tested the engine collision detection capabilities.

A final product is not interesting. It is not inspiring. What is, is your story.

So what is your story?

How long will it take to build a simple 2D Game Engine?

It took me three years to develop a 3D game engine. So I'm estimating that a decent 2D game engine should take about 1–1.5 years.

How long would it take to build a SIMPLE 2D engine?

I would estimate it should take you a couple of weeks. However, I doubt that you would call that an engine.

A game engine is a complex architecture. It is composed of algorithms and design patterns. All working together to render characters on a screen efficiently.

On the rendering side, your engine will need to render the different type of objects. Such as 2D images, sprites, text, etc. Thus, you will need to set up a Rendering Manager. The Rendering Manager will take care of all OpenGL operations.

You are also going to need to implement a Scenegraph. A scenegraph is a tree-like structure used in game engines to traverse game entities efficiently. The Scenegraph provides game entities to the Engine Loop. The engine loop then renders and updates the coordinate space of each entity.

In my opinion, a game engine is not an engine without a physics engine and a collision detection system.

How does a Physics Engine work? In a nutshell, A physics engine is responsible for solving the equation of motion and for detecting collisions. You can think of a physics engine as a continuous loop. It starts off by simulating an external force such as gravity. At each new time step, it detects any collisions, then calculates the velocity and position of an object. And finally, sends the location data to the GPU. This continuous loop creates the illusion that an object is falling due to gravity.

A physics engine does this by integrating Newton's Equation of motion. In computers, Integrals are evaluated using Numerical Integrations. Thus, you will have to implement at least the Euler Method. However, if you want a more precise method, you will need to implement the Runge-Kutta method.

To detect collisions, you will need to implement a Collision Detection System. A collision detection system works by detecting if bounding volumes are intersecting. You can set up your collision system to use spherical bounding volumes. However, they return many false detections.

A more precise detection system uses Convex Hulls as bounding volumes.

The intersection between Convex Hulls is computed using the Gilbert-Johnson-Keerthi (GJK) algorithm.

The GJK only tells you if two objects collided. It does not provide the Collision Contact Points. These points are essential to computing the proper collision response (impulse and resulting velocities) of collided characters. To obtain these Contact Points, you need to implement the Sutherland-Hodgman Algorithm.

The items listed above, are the minimum set of algorithms you need to implement to have a decent game engine. Nothing fancy or brag about. And per my experience, it should take you about 1-1.5 years to implement a 2D game engine you can be proud of.

P.S. Sign up to my newsletter and get Game Engine development tips. Or Get a Copy of my book below.

Creating a Framework in Xcode

My game engine is currently in beta phase. I have not released the engine to the public yet. Part of it is due to unresolved bugs present in the engine. Although the engine can handle a full blown game, such as a soccer game , I'm afraid that it is not ready for prime time.

Regardless if I release the engine to the public or not, I am interested in knowing how I would create my engine into a distributable framework using Xcode. It turns out that creating a framework using Xcode is very simple.

These are the steps to create a framework in Xcode:

Creating a framework

Step 1:

Create a new project and select "Cocoa Touch Framework."

Step 2:

Give your framework a name and select "Objective-C" as the language. Make sure the "Include Unit Tests" box is unchecked.

Xcode will generate a header file with the name of your framework. In this header file, we will include the header files of your API. So let's create the API.

Step 3:

Create a file representing your API and give it a name. I called the files "MyAPI."

Step 4 (Optional):

You don't have to do this if you code in Objective-C. But I like to code in C++; thus I need to change the extension of the files to ".mm" as shown in the image below.

Step 5:

Declare and implement your API files. In this example, I created a class with a "printHello" method.

Step 6:

Your users will not be able to use your framework unless you make the API header files Public. If you select the MyAPI header file and open up Xcode Utility pane, you will notice that under "Target Membership" the header file is set to "Project."

Make sure to set the header file to "Public."

Step 7:

Now, we need to import all the public header files of your API. To do so, open up the framework header file "MyFirstFramework.h" and import all public header files of your API. See highlighted line in the image below:

Here is a larger image. See line 20.

Screen Shot 2017-05-20 at 12.10.54 PM.png

Step 8:

Select Product->Build to build the framework. You can also use Command+B to build it.

At this point, the framework is ready to be distributed to your users.

Step 9:

If you need to locate your framework, right-click on the framework and click "Show in Finder." See the image below.

Screen Shot 2017-05-20 at 10.26.41 AM.png

Testing your Framework

Step 1:

Let's test your framework in a new project. Create a new "Single View Application" project in Xcode.

Step 2:

Give it a name and select "Objective-C" as the language.

Step 3:

Copy your framework into the new project. To locate your framework, see Step 9 above.

Step 4:

We need to make sure that the new project has the proper settings before it can use the framework.

Click on Build Phases and make sure that your framework is in the Link Binary With Libraries section.

Step 5:

Click on General. You will notice that the Embedded Binaries section doesn't include the framework.

Add the framework in the Embedded Binaries section.

Step 6:

You will notice that the Linked Frameworks and Libraries section contains a duplicate copy of the framework. Remove one of the copies.

Step 7 (Optional):

Since I use C++ in the framework, I need to change the extension of the AppDelegate and ViewController files to use the ".mm" extension.

Step 8:

Now you are ready to use the framework in the new project. Import the framework as shown in line 11 in the image below. You can now call the API classes as shown in the "viewDidLoad" method in the image below.

Build and run the project. And that is it.

Hope this helps.