How does the Game Engine Loop make a game possible?

Ever since I was a kid, I've always been captivated by computer graphics effects. The day I decided to look more into computer graphics was when Angry Bird became popular. I was amazed at the "sling-shot" effect and the collision between the blocks. Honestly, I would play the game to figure out how the collision worked.

So, I picked up a Game Development book and learned how to use the cocos2d game engine and the Box2d Physics system. Creating my first game demo with collision detection was exciting. However, the more I learned, the more I became intrigued. I wanted to learn more; I wanted to dig deeper into computer graphics.

Eventually, I decided to develop my 3D game engine, and it was then when I had to opportunity to dive deeper into Computer Graphics, OpenGL, C++, Design Patterns, Linear Algebra, and Computational Geometry.

Throughout the five years of the engine's development, I deciphered how a game engine truly works, what makes it tick and how each component is linked together to make a game possible.

In this post, I'm going to demystify the purpose of the Game Engine Loop.

Game Engine Loop

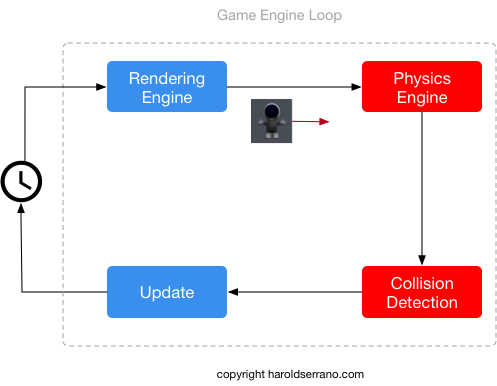
The heart of a game engine is the Game Engine Loop. It is through this loop that the interaction between the Math, Rendering and Physics Engine occurs.

 
gameengineloopflowpost1.png
 

During every game-tick, a character flows through these sub-engines, where it is rendered, and subject to physical-simulated forces, such as gravity and collision-responses.

At a minimum, a Game Engine Loop consists of a Rendering Engine and the Update stage.

 
gameengineloopflowpost2.png
 

Rendering Engine

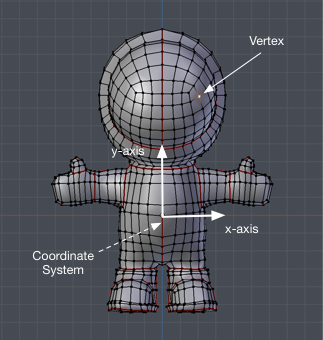
The first stop of a character is the Rendering Engine. The Rendering Engine's responsibility is to render the character depending on the entity's property. For example, if the object is a 3D character, it will enable the proper GPU Shaders (programs) that will utilize the appropriate attributes to recreate the character on the screen. When it comes to rendering a 3D character, a GPU will require at least these attributes: Vertices, Normal Vectors, and UV Coordinates.

 
gameengineloopflowpost4.png
 

However, if the entity is a 2D entity, the GPU will require only the Vertices and UV-Coordinates of the entity.

 
gameengineloopflowpost5.png
 

Unless you have never seen a video game, you know that a typical game contains more than just 3D or 2D characters. It contains skyboxes, explosion effects, etc. A Rendering Engine is capable of rendering each of these entities by activating the correct GPU Shader during the rendering process.

 
gameengineloopflowpost3.png
 

Updating the Coordinate Space

As mentioned above, to properly render an entity, the GPU requires the attributes of the entity. However, it also needs the space coordinates of the entity.

A Space-Coordinate defines the position of an object. Since a game character is made up of hundreds or thousands of vertices, a space-coordinate is assigned to the character, which defines the position of its vertices.

gameengineloopflowpost7.png

The space coordinates contain rotation and translation information of the character. Mathematically, the space coordinate is represented as a 4x4 matrix. The upper 3x3 matrix contains Rotation information, whereas the right-most vector contains Position information.

gameengineloopflowpost6.png

The space coordinate of an entity is known as the Model Space.

If you were to send the Model Space to the GPU, a game engine would render the entity on the wrong location on the screen. You may not even see it at all.

Why?

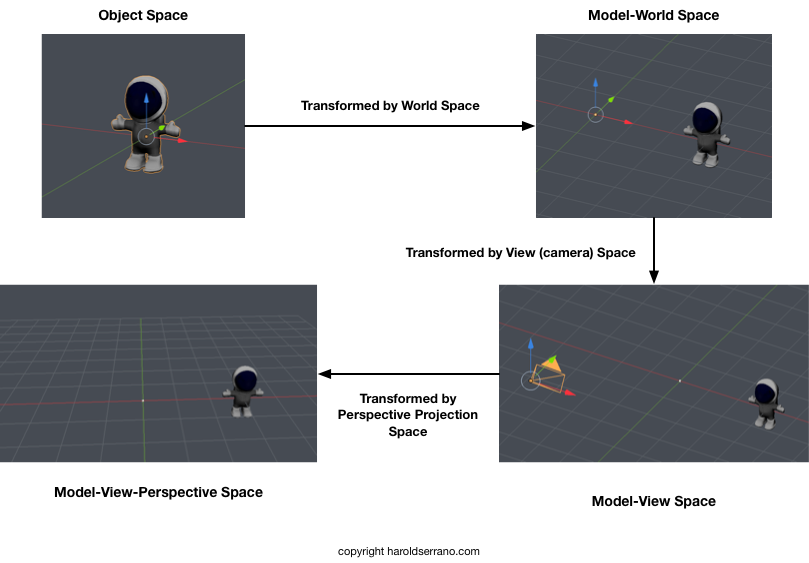
Because the GPU needs the Model-View-Projection (MVP) coordinate space to place the character on the screen correctly.

To produce the MVP space, the Model Space is transformed into the World Space. The product is then transformed into the Camera (View) Space. Finally, the resulting space is transformed by the Perspective- Projection Space, thus producing the correct MVP space required by the GPU.

 
gameengineloopflowpost8.png
 

The attributes of the entities are sent to the GPU during the initialization of the game whereas the space coordinate is continuously transmitted to the GPU during every game tick by the engine loop.

With these set of information, the GPU can adequately render the 3D entity.

Updating the character state

The next stop in the engine loop is the update stage. The engine calls each entity's update method and checks for the current state of the character. And depending on the state, the game developer sets the appropriate actions.

For example, let's say that you are moving the joystick in the game controller which makes the character walk. The moment that you move the joystick, the state of the character is changed to Walk. When the engine calls the update method of the entity, the walk animation is applied.

walkinganimation.gif

However, at this moment, the space-coordinate of the entity is also modified — specifically the rotation and translation components of the 4x4 matrix. And the new values are transformed into the MVP space and sent to the GPU, thus creating the walking motion that you see in games.

tutorial101.gif

Physics Engine

Most game engines provide a Physics Engine (with Collision-Detection System). A game engine interacts with this system through the Engine Loop.

gameengineloopflowpost9.png

The primary purpose of the Physics Engine is to integrate the Equation of Motion; which means to compute the velocity and position of an object from an applied force. From the newly calculated position, the space coordinate of the model is modified, which creates the illusion of motion.

For example, let's say a game has Gravity enabled. Gravity is a force that acts downward.

During every game-tick, the physics engine computes the new velocity and position of the character, thus modifying the coordinate system of the entity. Which upon rendering, creates the illusion that the character is falling due to gravity.

gravity.gif

Collision-Detection System

The Collision-Detection System works hand in hand with the Physics Engine. And it's purpose is to detect a collision, determine where the collision occurred and computed the resultant impulse force. Just like the other components, this system is called continuously by the Game Engine Loop.

gameengineloopflowpost10.png

Once the system detects a collision between two objects, it tries to determine the exact location of the collision. It uses this information to compute the collision response correctly. That is the impulse force that will separate the two colliding objects. And once again, the space-coordinates are modified, sent to the GPU, thus creating the illusion of collision.

collisionlab6a.gif

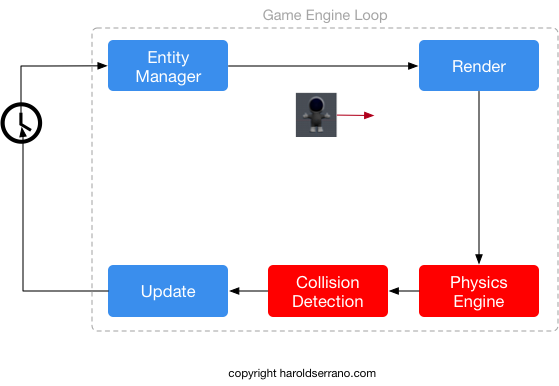
Entity Manager

There is a fourth component that works hand-in-hand with the engine loop. It's the Entity Manager. Its purpose is to provide game entities to the engine loop as efficiently as possible.

 
gameengineloopflowpost11.png
 

Let's say that a game has over 100 game entities; 3D characters, 2D sprites, images, etc. The data structure that you use to store these entities will affect the speed of the game engine. If you were to store these entities into a C++ Vector Container, the engine would slow down since it takes time to traverse the elements in a vector container. However, if these objects were stored in a data structure known as a Scenegraph, the engine's speed will not take a hit.

Why?

Because a scenegraph has a fast-traversal property.

The Entity Manager is in charge of managing the scenegraph, which provides the entities to the Engine Loop for rendering and update.

It is the Game Engine Loop that connects all the components of a game engine that makes video games possible. In my opinion, it is the heart of a game engine.

Hope this helps.

The easiest component to develop in a game engine

By far, the easiest component to develop in a game engine is the Rendering Engine. However, to beginners, this is also the component that will cause a bit of frustration. The frustration is not related to complexity, but confusion — especially when using Graphics APIs such as OpenGL, Vulkan or Metal.

So why is the easiest component to develop, also the most frustrating to get it working?

The problem lies in the fact that for a device to render a 3D model on its display, three things must work synchronously: The flow of data, GPU Shaders, and Transformations.

OpenGL/Metal are mediums that take attribute data from the CPU to the GPU. They transfer attributes such as vertices, normal vectors, UV coordinates and textures from the CPU into the GPU.

However, the GPU will not know what to do with these attributes until GPU Shaders have been compiled, attached and activated. Only then, will the Rendering Pipeline be ready to transform the space of the vertices, assemble, rasterize the primitives and finally send the data to the frame-buffer.

Finally, for all this to work, you need to have a good understanding of Linear Algebra operations, such as Transformations. In Computer Graphics, the most common transformations are Model-World Space, Model-View Space, and Model-View-Projection Space.

In summary, to render a simple cube requires a bit of knowledge of the OpenGL/Metal API, how GPU shaders work and their purpose within the Rendering Pipeline, and Linear Algebra concepts. It is not hard to see why computer graphics can cause a bit of frustration and confusion for beginners.

However, once you have a good understanding of Computer Graphics, developing a Rendering Engine becomes relatively easy when compared to other components of a Game Engine.

The Art of Game Engine Development

I've written several articles explaining how a game engine works. However, I feel that I left out an important concept.

Over the years, my view on Game Engine development has evolved. It has changed from "This is how you develop a game engine" to "There is no one way to develop a game engine."

When I started, I spent hundreds and hundreds of hours pouring over technical books; learning, deciphering code snippets and trying to implement the same ideas I learned on my game engine.

There is nothing wrong with the approach mentioned above. But over the years, I realized that Game Engine development is not only science, but it is also an ART.

There was a point in the development of the engine when I stopped treating the implementations provided in technical books as "Gospel." Instead, I would make an effort to truly understand the "concept" and then go on and implement it my way.

When I did this, I started to fall in love with Game Engine Development. That was the moment that I felt that I was genuinely doing Engineering.

To develop a game engine, focus on understanding the primary role of each component, but implement the internals of each component, not as mentioned in a book, but as YOU think is the best way.

In other words, let your creativity flow through your game engine. Game Engine Development is science mixed with "technical" art.

Documenting the Untold Engine

Here is a tip I would like to share:

Approach documenting your project, as a project itself.

I started documenting the engine months before I released it. I was hoping to have the documentation ready by the Release Date. However, that never happened. Documenting a project is a lot, a lot of work and you should treat it as a project itself. Overall, it has taken me over eight months to document the Untold Engine.

 
In version beta v0.0.11, I implemented several camera behaviors such as First Person Camera and Third Person Camera. The particle system was also improved. Moreover, the camera culling was also improved.
 

Trust me; I've been working on the documentation daily.

So what type of documentation is currently available in the engine. Well here is what I have done.

The Documentation is divided into the following sections:

  • Labs & Tutorials
  • API Usage
  • Digital Asset Exporter
  • Architecture
  • Modules

The Labs & Tutorials section provides several labs that will help you get started with the engine. You will have a chance to learn how to render a game character, how to add collision detection, etc. It is an excellent way to get started using the engine.

The API Usage section helps you understand how to use the Untold Engine's API. This section is geared to users who have gone through the Labs & Tutorials section and are ready to start playing around developing their games. You will learn how to render 3D objects, skyboxes, text, etc. using the engine's API. You will also learn how to use the Physics Engine, Callbacks, etc.

The Digitial Asset Exported section is a critical section to read. This section will explain how to import a 3D object/animation from Blender and use it in the Untold Engine.

The Architecture section is not complete yet. This is the section that requires a lot more work. My goal is to provide dozens of articles explaining the entire architecture of the Untold Engine. This will be massive work, and I hope to complete it in about six months or so.

When I released the engine, I was fully aware that the Documentation was lacking and I have put a lot of work on writing these articles. I hope you find them useful.

Thanks for reading.

Progress Update: Game Engine Beta v0.0.11

It feels like a long time since I updated the engine. The last version was released on Feb 2017. However, throughout this whole, I released the engine as an open source. I also spent a considerable amount of my free time writing documentation for the engine and fixed several issues that I encountered along the way.

Today I'm happy to say that I have released Beta version 0.0.11 of the Untold Engine.

The main updates to the engine are the following:

  • Implemented a Camera System that can handle a First Person Camera, Third Person Camera, and a Basic Follow Camera.
  • Improved the camera culling computation. If you recall, the previous version had problems with the Camera Culling. In this version, the engine allows the developer to set the desired time interval to compute the culling. However, there is a bug that I found out a bit too late. Shadow rendering is slowing down the culling computation. I will fix this in the next version.
  • Implemented an actual 3D particle system. The previous version was able to produce 2D particle systems. This is no longer the case.

Here is a video showcasing v0.0.11. As you can see in the video, the engine allows you to switch between Basic Follow Camera to First Person and the Third Person Camera. The video also shows a 3D particle system.


You can download the engine from Untold Engine

Thanks for reading.